
Its possible to give teleporting ability to every single creature in your Heroes 5. Just you need to know how ;). This guide is created for everyone who dont know.
In this guide will use the Wraith as experimental mouse.
Step 1
Furst you have to do some changes in the creature ".xdb”
Open GameMechanics/Creature/Creatures/*Choose race*/*Choose creature ".xdb”*
in our case will open GameMechanics/Creature/Creatures/Necropolis/Wraith.xdb
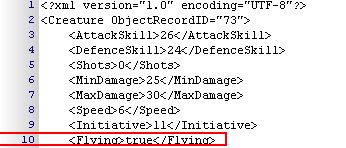
See line number 10 first <Flying>false</Flying>, this is the first thing you have to change. “false” have to be changed to “true”, see it here:
Step 2
Using existing animation as effect
After doing this you have go add effect for teleporting.
So go to GameMechanics/CreatureVisual/Creatures/*Choose race*/*Choose creature ".xdb”*
In this guide we will open GameMechanics/CreatureVisual/Creatures/Necropolis/Wraith.xdb You have to give starting and finishing animation to your new teleporting creature.
When you open the ".xdb” you’ll see this:
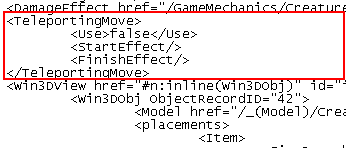
The changes you have to make are simple. First "<Use>false</Use>" (line 16) must be "<Use>true</Use>". Second line 17 and line 18 are "<StartEffect/>" and "<FinishEffect/>", as it’s written the lines are for the animation. You can choose every animation you want. You can place different anim for start and finish (the starting animation is the animation which is shown when the ability begin, on the creatures normal locaton, the finishing anim is shown on the creatures new location, after it get teleported).
You just have to write the animation address (you can use effects of spells, other creatures abilities, etc…) in this case lets use the anim of Harm touch ability, this mean we have to add this text:
href="/Effects/_(Effect)/Characters/Creatures/Necropolis/Wraith/specability_hit.(Effect).xdb#xpointer(/Effect)"/>
(the abilities address) see here:

For example you can give your creature Devils effect with writing this for starting and finishing:
href="/Effects/_(Effect)/Characters/Creatures/Inferno/Devil/Teleport.xdb#xpointer(/Effect)"/>
After this steps you dont have more work, save all changes in map format and try it :)
Creating own animation as effect
Go to Effects/_(Effect)/Characters/Creatures/*Choose race*/*Choose creature folder*
In this case “Effects/_(Effect)/Characters/Creatures/Necropolis/Wraith”
Here you have to add new ".xdb”, the basic of it’s script you can take form:
Effects/_(Effect)/Characters/Creatures/Inferno/Devil/Teleport.xdb
First change "<PerParticleFog>false</PerParticleFog>" to "<PerParticleFog>true</PerParticleFog>" (line 17)

Next go on line 41-75 (<Textures>):

As you see here are the textures. But here they are fire textures, rocks and etc…
You can create your own animation by changing the existing textures addresses. Or if you remove part of them.
So I leaved:
<Item href="/Textures/Effects/_Various/Smoke02.xdb#xpointer(/Texture)"/> <Item href="/Textures/Effects/_Various/Smoke03.xdb#xpointer(/Texture)"/> <Item href="/Textures/Effects/_Various/Glow05.xdb#xpointer(/Texture)"/>
Copy the fail in
Effects/_(Effect)/Characters/Creatures/*Necropolis*/*Wraith*
Then do again [b]Step 2[/b] but this time use
href="/Effects/_(Effect)/Characters/Creatures/Necropolis/Wraith/Teleport.xdb#xpointer(/Effect)"/>
as address:

Save all changes and try.