
Texture Editing Tutorial
DISCLAIMER - the exact sequence given in part II has not been tested, it is written from experience, so I may have missed something - I’ll get round to checking it at some point, and I may also upload some screenshots if anyone thinks they might be helpful.
Lets see I if can be of help here. Texture modding is one of the easiest things that we can do to HoMM, which can make a big – visible – difference. Since we can’t insert our own models and animations into the game, this is one of the best options for creating new-looking creatures (indeed we can sort of edit models through texture editing). This guide ought to be something from the ground up, suitable for (almost) total newcomers – if you already know bits of it such as how to use Photoshop or how to access the data files, please just ignore those sections. I’m not a huge expert though, so there’s bound to be problems in here somewhere…
Contents
This tutorial works through editing the Imp. The simplistic modification is in part II (check out section 16 too). Parts III and V work through more advanced changes, using the Imp → Abberant Scourge conversion as a guide. If you want to find some other textures to play with, sections 13 and 16 will be useful I hope.
I. Preamble
1. Current guides in existence
2. Introduction
3. How the game deals with textures
4. File format
II. A retexturing – the Imp
5. Where are all the textures?
6. Creating the working environment
7. The first edit
8. Further edits
9. Getting it in-game
III. How to retexture in Photoshop
10. Basic advice
11. How to use Photoshop - return to the Imp
12. The alpha channel - transparency
IV. Appendix
13. How to find textures in the data zip
14. MIP maps
15. DDS types
16. Editing the combat texture of the Imp (and some other creatures)
V. Editing other graphical things, rather than textures
17. Animsets - back to the Imp and Scourge again
18. How to swap animations
19. Effects - yet more Imp and Scourge
20. Icons
Right at the end: how to distribute the mod.
Preamble
1. Current guides in existence
There have been many generous donations to the tome of modding knowledge. I apologise if I have duplicated anything from these and others in this, my own tutorial.
Radar’s creature appearance changing tutorial, where there’s some advice here about changing icons
sfidanza’s post on general editing including this handy diagram
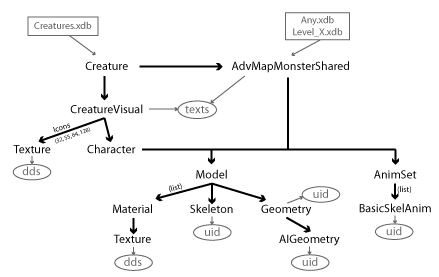
Plus other articles here on the wiki, in particular the extant texturing tutorial, Modding For Dummies: Texture Modding
Also there’s 2ndHero's GIMP tutorial
2. Introduction
Texture editing requires a powerful graphics editor. This guide is for ADOBE PHOTOSHOP, because it’s the only thing I can use (sorry I know it’s not the easiest option for many since it’s quite costly) – in my case CS3. You will also need a DDS plugin - this is the one for Photoshop.
If you don’t have Photoshop you can use any image editor than can read and save DDS files, or alternatively convert them to a different format, edit that, then convert back. The link at * above has some info on this. GIMP is a good free alternative to Photoshop apparently – try Googling “GIMP DDS” to find a plug-in.
3. How the game deals with textures
As you can see from the diagram, any given creature has making up its model:
- Materials
- Skeleton
- Geometry
The skeleton is a collection of `bones` that is used to move the creature. The animset gives the instructions for how to place and move the bones (it can also scale them), and the game engine then joins the geometry – the skin – to the skeleton, moving it appropriately to give something that looks good and isn’t impossible to program. It then `paints` the right textures onto this geometry.
Of course, these are complicated 3D structures, so there’s no easy way of turning the desired texture on the model into a flat, 2D file. Imagine trying to wrap a sheet around yourself so that it follows your shape exactly – it’s just not possible. This means the game stores little pieces of texture, which it then paints on to a part of the geometry, stretching it so that it does fit perfectly. These little bits aren’t stored separately; they’re all in one single image file, jumbled up. You might find arms jammed between legs, and shoulders next to teeth. This does cause a little bit of a problem – just looking at this image (the texture file), there’s no way of knowing which part will be painted on which bit of the geometry. You can only make educated guesses based on the colours of each bit – and of course, experiment and see what happens when the game pastes on the texture.
4. File format
Texture files aren’t jpegs or bmps – they’re stored as DDS files. Not all DDS files used by the game are of the same variety – just like a HoMM savegame could be for a campaign or a single-player map, etc.. For creature textures there is a general format used, which will be looked at later. Unlike your average image file, this doesn’t just store the texture as an image, it also stores what’s called an `alpha` channel. This determines the translucency of each part of the image, see section 12.
Section 15 may also be relevant.
A retexturing – the Imp
5. Where are all the textures?
Bundled up with all the other data for Heroes – in the data folder of your game’s install directory (likely C:\Program Files\Ubisoft\Heroes of Might and Magic V\data\, TotE has its own folder under Ubisoft and HoF has its own folder under HoMM5, dataa1). You need to get inside data.pak / dataa1.pak / whatever the TotE one’s called. Fortunately this is just a zip file, so you can open it with any program that reads the zip format. I recommend 7-zip.
Let’s pick the adventure-map Imp as a creature to retexture. You can find his DDS at: data.pak\_(Model)\Creatures\Inferno\Familiar_LOD-Familiar_LOD.(Texture).dds. (Yes, their names really are swapped round.) Navigate there now inside your zip program.
6. Creating the working environment
The editor loads the files in data.pak of course, but it will also load files sitting `loose` in the data folder. Create a _(Model) folder within the data folder, then a Creatures folder within that, then an Inferno one inside that. Extract the DDS from the zip to this location. The editor will now use this file instead of the one in the data.pak file, so we can edit it and see what happens. Open the editor, and create a new map. Put an Imp on it. Unsurprisingly, it looks just as it always does.
Right click on the DDS and go Properties, where you need to make sure Read-only is not checked.
Now fire up Photoshop and open the DDS file in the Inferno folder using File>Open. If the DDS plug-in is installed properly, you should be presented with another dialog box. For now, untick “Load MIP maps” (MIP map explanation coming at the end) and select “Load Using Default Sizes”. The Imp file will now open up, and as you can see, his bits are all jumbled up – some pieces are obviously a head or hand, others are a bit more mysterious.
7. The first edit
In Photoshop, go Ctrl+U. Play around with the three sliders as much as you wish to recolour the Imp, then click OK, then save – up comes a scary dialog box. From the top drop-down list, select the third item on the list (should be “DXT3…”), and also make sure “Generate MIP maps” is selected. Everything else ought to be fine left as it is. Click Save. Go back to the editor and save your map as something. You’ll notice the Imp still looks the same, because the editor has loaded his original texture into memory. Close and reopen the editor and reload the map, and this time the editor will pick up the new texture that you created. With any luck, you should see your new recoloured Imp! :D
8. Further edits
Do something else to the image in Photoshop – another recolour will do. To view your new texture in the editor, just click the Reload map button (on the toolbar it’s an R within an arrow). The editor ought to update with the new texture. The in-combat Imp will not look any different if you were to view it in the editor (ask if you want to know how to do this). More later on how to edit the in-combat imp.
9. Getting it in-game
The easiest method (in terms of explaining it!) is the following: Zip up the _(Model) folder and its contents with your zip program, maintaining the folder structure, and rename its file extension to “.h5m” from “.zip”. Then simply move this file to the Maps folder within your Heroes install directory. (Don’t forget you may need to turn file extensions on to rename the extension, ask for details).
Hopefully if you now run the game, any adventure-map Imps will now have the new texture – obviously you’ll need to start a game that will have an Imp stack present in it somewhere (I don’t think loading a saved game will suffice). If you can’t find one, go back to the map you were editing in the editor and turn it into a proper map, then play that map in the game (add a hero and town for each player, give the heroes armies, the towns specialisations, name the map etc. – when you save it will tell you what else you need to do).
How to retexture in Photoshop
10. Basic advice
Normally a simple recolouring will create no wonders, although this does of course depend on the situation. At the very least, you should probably do a multiple recolouring, for example by in the Ctrl-U dialog selecting something in the drop down list, editing the sliders for that, then selecting something else in the list. There are loads of useful tools in Photoshop; in particular, off the top of my head: - Clone tool - Lasoo and other selection tools - Quickmask - Copying bits off other textures or images!
Often trying to draw things yourself with the brush and pencil tools looks bad, alas we are not all Nival graphics artists… :sad: It’s very hard to learn to be creative, but generally keeping things colour-matching and realistic and the result should be good.
11. How to use Photoshop - return to the Imp
Well this one could take some explaining :P. What I’ll do I think is explain how I went about making the Abberant Scourge for Tales of Karador, which was based on the Imp: Daystar and Cepheus (I think) helped greatly here by giving me a good start.
The downgraded Troglodyte texture (based on the Imp as said) is here and the creature looks like this on the adventure map.
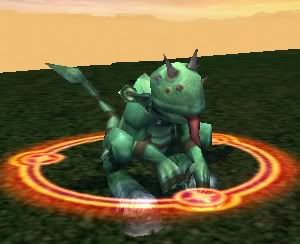
I knew the Scourge needed to be similar to the other creatures on page one of the ToK thread. Since blue looks more realistic than purple in most cases I decided first to use Ctrl+U to change the green to blue. Moving the sliders helps select just the range of colours I want to be changed (this is more precise than the drop-down list). I did this again to change the bands on the texture to dark blue, after trying purple and deciding that the colours didn’t match well. Sometimes using the sliders on the dialog is not specific enough. To only change certain areas of the image you need to select them first. The lasso and magnetic lasso tools do a good job of this (the latter is like the lasso selector but `sticks` to edges) - type L to select the lasso, then Shift+L twice to go down to the magnetic lasso. The polygonal one that you can get to by doing this just once may also be useful. Once you’ve selected an area, Ctrl+U will only affect that area. You can still be selective about the range of colours that are being changed, as ever. IIRC, selection was needed for the Scourge.
That was the basic colouring done, but now it needed to look different from the Troglodyte. Firstly I removed the bands from the Imp’s fingers. This was done using the clone tool (type S for it). Hold Alt and click on the area you want to clone. Then when you paint, it copies this area to the new area. I copied some plain skin from lower down the fingers, on top of the bands, so that they disappeared.
Nextly I wanted some glowing parts. Glows are hard to draw straight off or by using a gradient or something. Remember the problem earlier, that we weren’t Nival graphics artists? Well true as it is, we can still copy their work. By this I mean, steal some texture from another creature that is suitable and also much better than something you could do yourself (image searches on the internet can also provide this facility!). For me this meant using the glowing blue of one of the Ghosts from Ghost Mode (I actually copied the glow from a screenshot). Again using selection tools I selected the area I wanted, then copied and pasted this into my Scourge File. Once there, I duplicated it multiple times using Ctrl-J. For each one, I used Ctrl-T to resize and rotate it so that it fit a certain part - for example the glow was used on the feet and hands. To allow texture to show through underneath the glow layer, I either changed the opacity of the layer in the layer palette, or (perhaps, I can’t quite remember) used a different layer mode from the drop-down box next to the opacity one. Sometimes I had to mold the shape of the layer using the eraser tool (type E). Don’t forget that it is okay to overlap onto the surrounding black bits of a part of the texture, since these are generally not used at all to render the creature in the game/editor.
I also needed to make the edge of the glows soft, so that they blended in with the blue skin. This is a little trickier, and requires layer masks, which I’ll go into at some other point.
Don’t expect the first thing you do to look perfect. This creature went through many states before I was happy - for example I tried putting lightning on the body, and the glows moved around a lot too. You always have Ctrl+Alt+Z for undo, and Ctrl+Shift+Z for redo, if you need to get rid of a change that you’ve just made.
Also for the Scourge, I changed the animset (see section 17) to change the shape of the creature, and gave it an effect, the lightning (see section 19).
Final image (I may upload the texture file at some point).
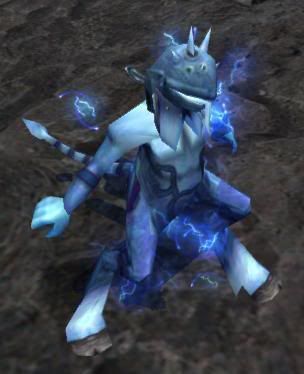
Cepheus made the wings transparent by using the alpha channel…
12. The alpha channel - transparency
Once you have a fair grasp of Photoshop, you ought to become aware of channels. DDS files, like many other image files, store pixels with values of red, green and blue. All screen colours are made up of different combinations. Photoshop allows you to see these individually if you click “Channels”, usually in the layers box (you may have to enable it on the Window menu first). You can click on the eyes to see the RGB channels, and you should also see an alpha channel, which you can edit like any normal image, except only using black, white and greys.
When only the alpha channel is in view, you will see these greys, otherwise it will appear as a red overlay on the image. You can use all the standard tools to edit this, but you are limited to greyscale. Bits that are red / black are invisible in the game, and you can therefore paint over bits of the texture to stop them appearing on the creature, useful for getting rid of pointy bits in the model such as wings or weapons (this method tends to leaves a hole through the geometry so it’s not suitable for much else). This is one technique for model editing.
Grey in the alpha channel creates translucency (c.f. Spectres). Daystar explains this here.
Appendix
13. How to find textures in the data zip
Dear Nival scattered the DDS textures throughout the data file, located in all sorts of places. Combined with multiple DDSs for some creatures (see section 16) and some creatures being named differently in the data to what they are in game (remember the Imp / Familiar confusion earlier), it can be hard finding what you want. I’ll explain more later, for now ask if you can’t find one which you want.
14. MIP maps
If you load these in when you open a DDS, you will see multiple differently sized versions of the texture. The game uses these to speed things up. Imagine if, when you zoomed out, the game still had to render as much detail as it did close up – it would get very slow! So it uses the low-resolution textures. Before, we had Photoshop generate these when we saved, but you can edit them ourselves if we like, so long as you select “Use Existing MIP maps” when saving. If you are doing a colour change, you should always use this method really, since you will affect all the different sizes at once. For more detailed changes, use the method detailed above.
The reason why you should always edit the MIP maps yourself whenever possible is that the low-resolution sections provided by the game are of a better quality than those Photoshop generates itself.
15. DDS types
Every texture file (DDS) in the data paks has a corresponding XDB file with data about the image. This tells you what DDS type the relevant DDS is. When you save in Photoshop, you need to pick something from the drop-down list that fits with the text inside "<format></format>". If you see “TF_DXT3”, the choice is obvious, it’s the third one down, as said. “TF_8888” requries selecting one of the “8.8.8.8” ones.
16. Editing the combat texture of the Imp (and other creatures)
Coming soon. Please note that only creatures from the original game suffer this problem. If you were to edit the texture of a HoF (or presumably TotE) creature, it would update the combat creature too.
Editing things other than textures - animsets and effects
17. Animsets - back to the Imp and Scourge again
To the best of my knowledge, we can extract animations, skeletons and geometries in various formats, such that they can be modified. However, I don’t think we are yet able to load these back into the game. Investigations are ongoing, I hope! :D I look forward to the day that it becomes possible, but it is looking like this is unlikely to happen.
Given this, I thought it would be a good idea to see if any geometries could be mixed with another creature’s skeleton to create a new-looking creature. Unfortunately, none of the combinations I tried worked at all, and I assume none of them will. However what we can do is change just the animset for a creature. This does create some working combinations.
Let’s return to the Scourge. After trying just about every humanoid animset, the ones that worked were two Dwarf ones, plus the Hunter set. The animset modifies the shape of the Scourge to what it is in section 11 - no longer the standard Imp shape at all. However, the animations are not perfect - you’ll see that there is a stretched panel near the neck, and the feet look a bit strange. This obviously limits the professionalism acheivable by modification of the animset. Given this Kronos decided that the ToK Beta at least would use the Imp animset. As such, I have not completely checked all the individual animations (death, attack, move etc.) of the above animsets.
18. How to swap animations
I haven’t tested this yet, so I won’t go into detail until I do. That’s likely to be a in a fair while’s time I’m afraid.
19. Effects - yet more Imp and Scourge
You’ll notice from the image at the end of section 11 that the Scourge is surrounded by lightning. This is an effect, not part of the model itself.
More coming soon.
Try Eugen_Cosmarul’s guide here.
20. Icons
Coming soon.
So there you go, hope this is useful to someone out there. To distribute the mod just upload the h5m file that I talked about earlier to something like Mediafire. You should probably change the ending to ".h5u” first. Don’t forget to complete a texture mod you may well need to change the icon(s) for the creature etc. too - try looking at Radar’s guide for now. Editing those works much like creature textures (the DDS type may be different). Section 20 will detail this at some point.